Smart Home Integration Auckland: What to Plan During Your Reno
Originally posted on Smart Home Integration Auckland: What to Plan During Your Reno
Superior Renovations - Auckland’s Trusted Home Renovation Specialists
Smart Home Integration Auckland: What to Plan Before the Walls Close Up
Quick answer: The best time to integrate smart home technology into an Auckland home is during a renovation — before walls are closed and cables can be run cleanly. Smart lighting, climate control, security, motorised blinds, and EV charging can all be built in from as little as $1,500 for a single-room start, up to $25,000–$30,000 for a whole-home system.
There’s a moment in every renovation where the walls are open, the ceiling is stripped back, and every tradie on site can see exactly where the wires run. It lasts about a week. After that, the GIB goes on and the opportunity to future-proof your home without ripping it apart again is gone.
That’s the window. Most Auckland homeowners miss it — not because they don’t want smart tech, but because nobody raised it early enough in the planning process.
We’ve been doing this long enough to know that smart home integration is almost always an afterthought. A client in Remuera called us six months after their kitchen renovation was complete, wanting to add automated lighting and a security camera system. The kitchen looked great. Getting the wiring in cost nearly double what it would have during the original job.
This guide is for homeowners who are renovating — or thinking about it — and want to know what’s actually worth planning ahead for. Not a wishlist of gadgets. A practical breakdown of what each system involves, what you need to run it properly, how much to budget, and what to ask your renovation company before work begins.
We’re not selling you a smart home. We’re telling you what we’ve learned from building them.
Why a Renovation Is the Right Time to Think About Smart Home Technology
The Infrastructure Problem Nobody Talks About
Smart home technology gets marketed like it’s plug-and-play. Sometimes it is. Smart bulbs, a video doorbell, a connected heat pump controller — you can add these to almost any home without touching a wall.
But the good stuff requires infrastructure. Conduit runs. Dedicated circuits. Data cabling. Flush-mounted keypads. A properly sized switchboard. If you want smart technology that’s actually integrated into your home — not just a collection of apps on your phone — the bones need to be right. And those bones are cheapest to get right when the walls are already open.
Think about what a renovation typically exposes: the ceiling cavity, the wall framing, the subfloor. An electrician working alongside your renovation team can run Cat6 data cable, low-voltage speaker wire, or conduit for motorised blinds in hours. The same job in a completed, lined home takes days and leaves a trail of patched GIB and repainted walls.
💡 Quick tip: Ask your renovation company to co-ordinate a smart home electrician during the rough-in phase — before GIB goes on. One conversation at the right moment saves thousands later.
What Auckland Homes Actually Need
Auckland housing stock creates its own challenges. The older villas in Grey Lynn and Mt Eden weren’t wired for a 10-circuit smart lighting system — they were built when two power points in the kitchen felt modern. Many have been partially rewired over the decades, leaving a mix of old and new cabling that doesn’t sit well with smart home controllers.
If your home was built before 1990, there’s a reasonable chance a switchboard upgrade is part of the smart home conversation before anything else. An undersized switchboard — still common in 1970s brick-and-tiles across Henderson and Manurewa — can’t safely handle the additional load from EV charging, climate systems, and smart appliances running simultaneously. An upgrade runs approximately $2,000–$5,000 in Auckland depending on scope. Not glamorous, but it’s the foundation everything else sits on.
For homes built after 2000, the infrastructure is usually better. But even newer builds in subdivisions like Hobsonville and Millwater often weren’t spec’d for whole-home automation — they were built to a budget, with standard switches and a basic switchboard. The wiring is modern, but the capacity for smart systems often needs a top-up.
Starting Small Is a Legitimate Strategy
You don’t have to do it all at once. This is important to say because the smart home industry has a habit of making everything sound like an all-or-nothing commitment.
It isn’t. PDL Wiser — one of the most widely used smart home systems in NZ and a product we work with regularly — is explicitly designed to scale. You can start with smart lighting in the kitchen during your renovation, and expand to climate control, blinds automation, and security monitoring over the following years. The Zigbee 3.0 and Bluetooth Low Energy protocol means devices talk to each other without requiring complex professional reprogramming each time you add something.
The key is making sure the conduit, cabling pathways, and switchboard capacity are sorted during the renovation. That’s the upfront cost. Everything else can come later, when your budget allows.
“The clients who get the most out of smart home technology are the ones who thought about it at the design stage — not the ones who decided they wanted it after the GIB was on. Even if the budget isn’t there right now, running the conduit costs almost nothing during a reno. It costs a lot when the walls are done.”
— Eunice Qin, Designer, Superior Renovations
The question isn’t whether smart home tech is worth it. For most Auckland homeowners renovating a family home they plan to stay in, it is — both for daily comfort and for resale value. The question is which systems matter most for how you actually live, and when to spec them in.
The sections below break down each major category. Read the ones relevant to your renovation — kitchen, bathroom, living areas, outdoor spaces — and use them as a checklist before your build starts.
Smart Lighting and Electrical — The Highest-ROI Upgrade in Any Renovation
Why Lighting Is Always the Starting Point
Ask any smart home installer in Auckland where most clients start. Lighting. Every time. And there’s a good reason for it — smart lighting is immediately visible, immediately useful, and delivers a noticeably better result than standard switching without requiring you to change how you live.
The difference between a standard kitchen renovation and one with properly specified smart lighting isn’t subtle. Walk in at 6am to make coffee — the lights come up at 30% warmth automatically. Shift to meal prep — full task lighting over the bench at 5000K. Dinner party — the lights drop, the atmosphere changes, all from a single tap or a voice command to Google Home or Amazon Alexa. That’s not a gimmick. That’s a kitchen you actually want to be in.
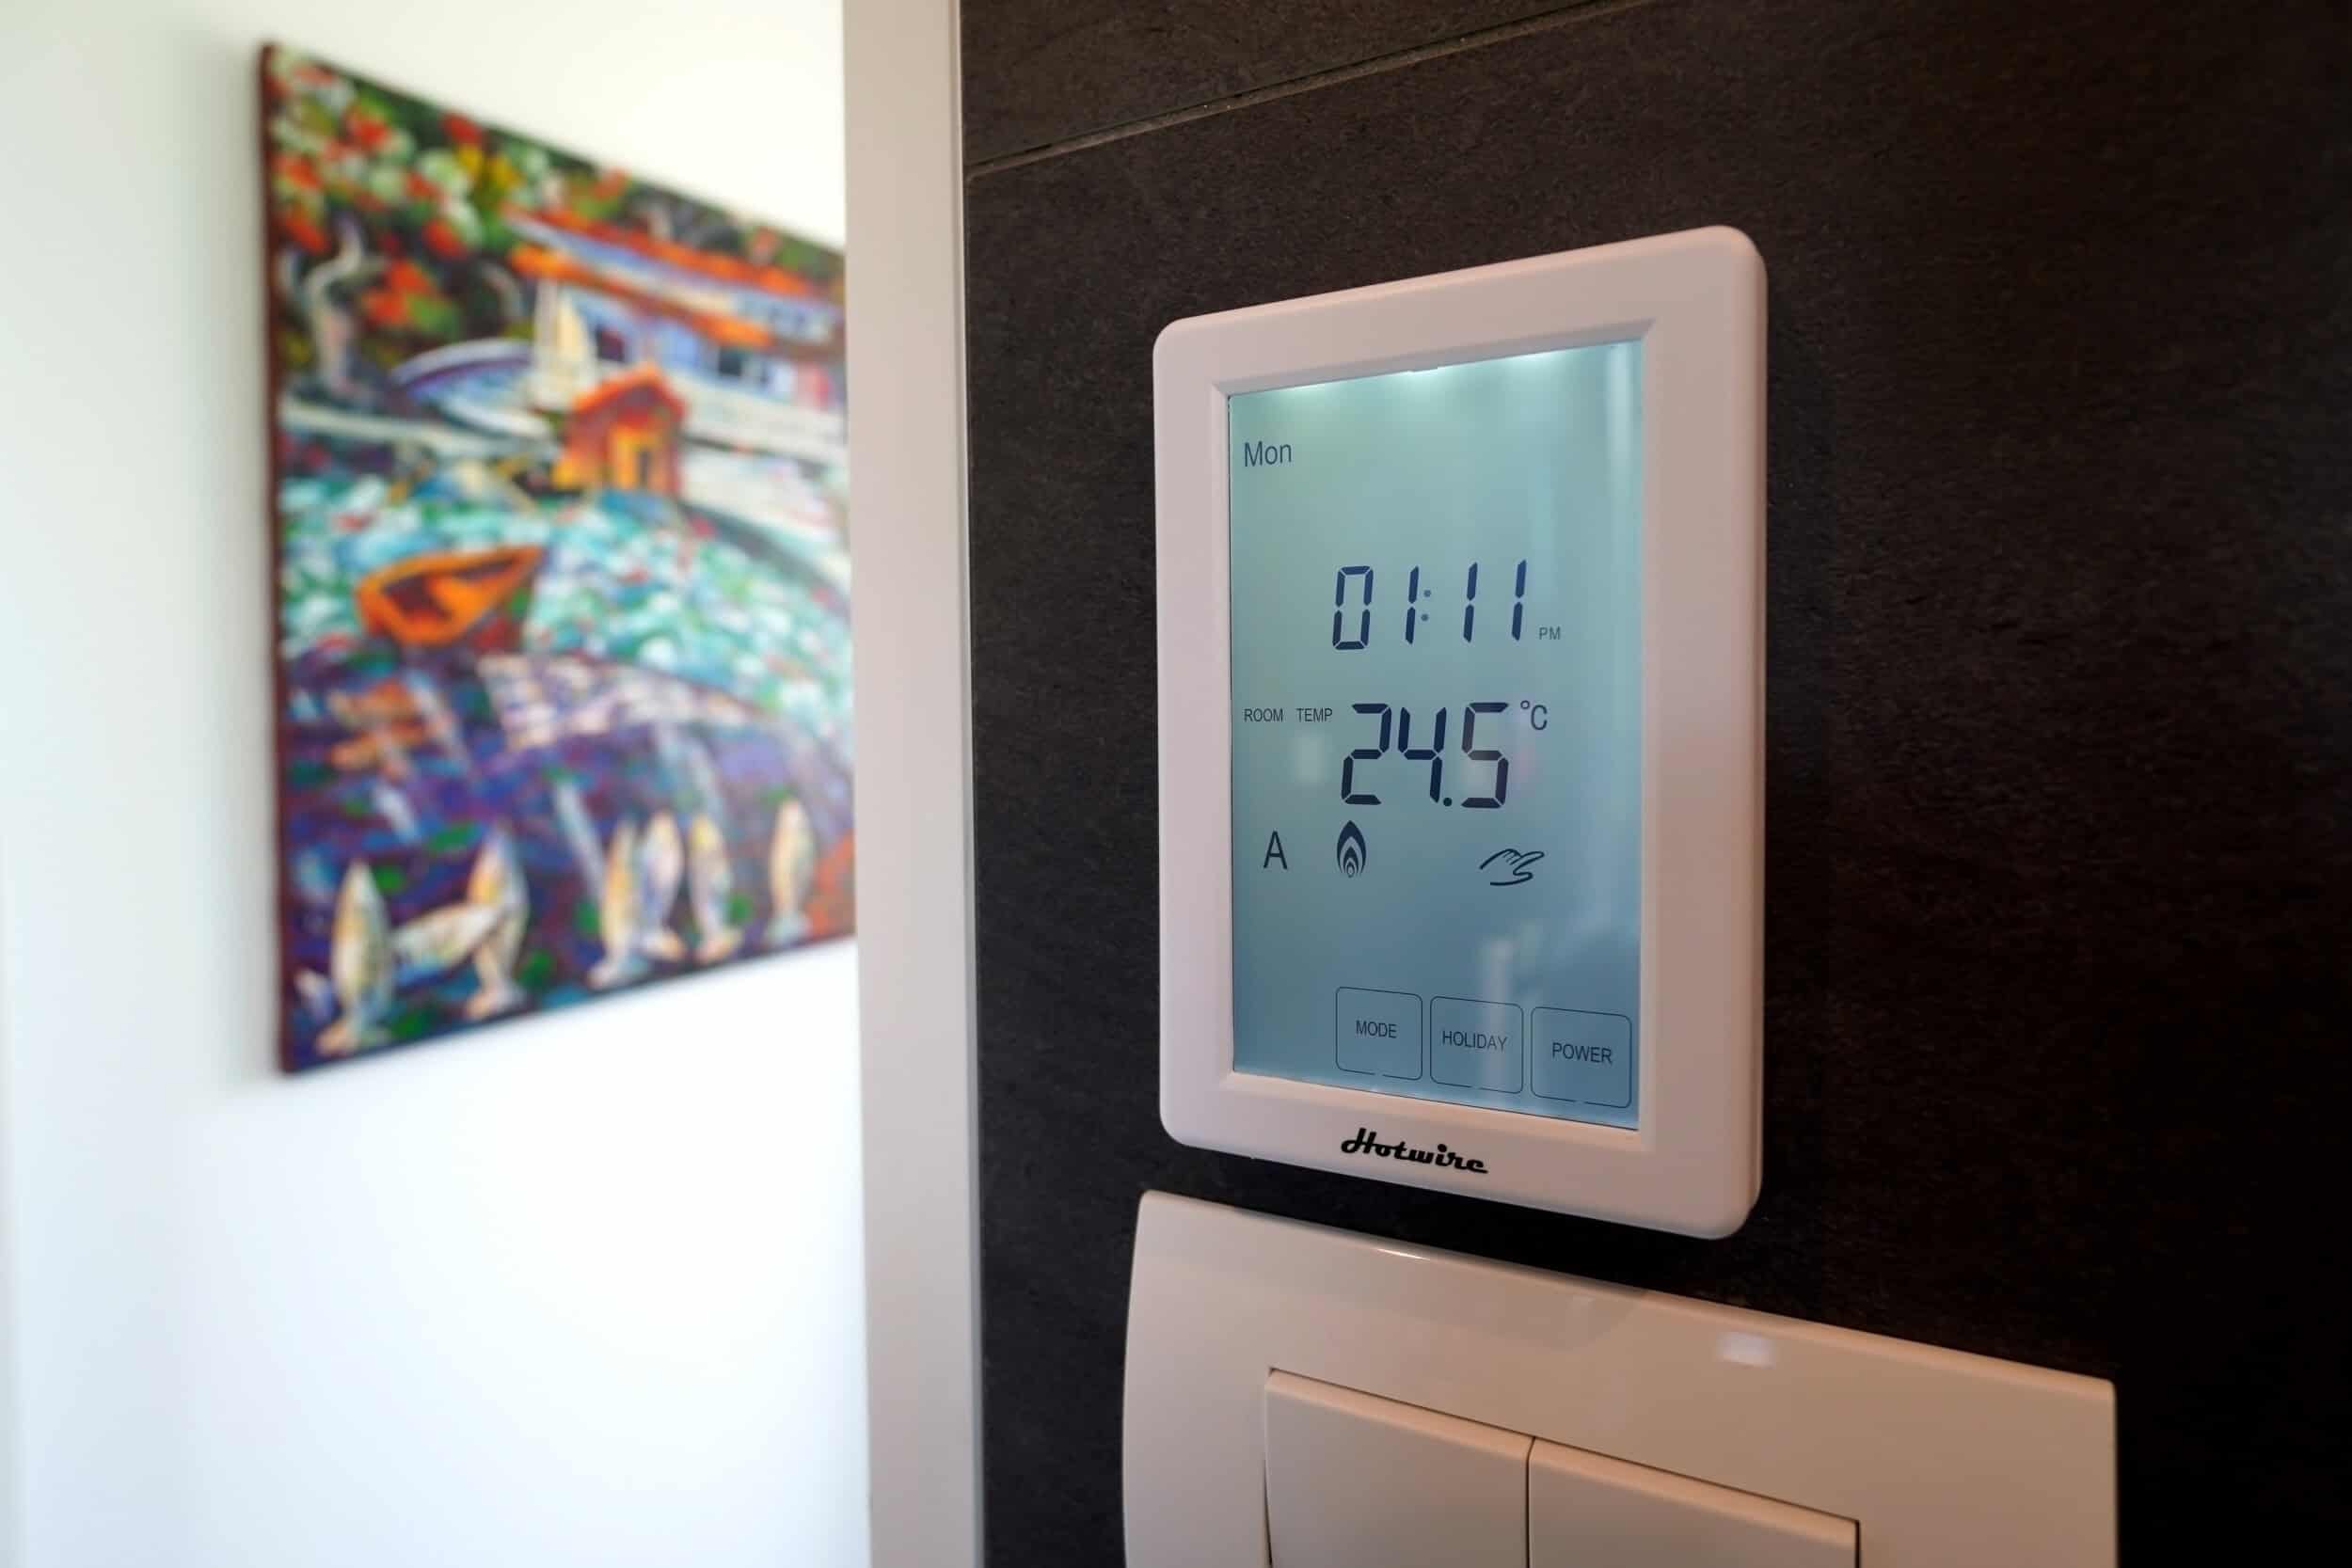
PDL Wiser — The NZ Smart Lighting System Worth Knowing About
We partner with PDL by Schneider Electric for smart home electrical because their Wiser system was developed specifically for the NZ market, has been in local homes for over two decades, and integrates directly with their award-winning Iconic switch range. That last point matters more than it sounds.

PDL Wiser’s Iconic switches look like standard switches. Clean. Minimal. They don’t scream “smart home” or date the way some systems from a decade ago do. During a kitchen or bathroom renovation, they can be specified in the same way any other switch would be — your designer selects the finish that suits the aesthetic, and the smart functionality sits behind it quietly.
The system runs on Zigbee 3.0 — a reliable mesh protocol that doesn’t depend on a single Wi-Fi router for coverage. For larger Auckland homes or multi-storey renovations, this makes a real difference in reliability.
💡 Quick tip: PDL Wiser’s Iconic connected dimmers and switches are compatible with existing PDL wiring — if you’re renovating and your home already has PDL standard switches elsewhere, the upgrade path is straightforward. No need to touch wiring that doesn’t need changing.
What Smart Lighting Actually Costs in an Auckland Renovation
Budget ranges vary significantly depending on how many circuits you’re automating and what level of control you want. Here’s a practical breakdown for Auckland conditions.
| Scope | What’s Included | Approximate Cost (NZD incl. GST) |
|---|---|---|
| Single room (e.g. kitchen) | Smart dimmer switches, connected LED downlights, Wiser Hub, app control | $1,500–$3,500 |
| Main living areas (3–4 rooms) | Smart switches/dimmers throughout, scenes, voice control integration | $4,000–$9,000 |
| Whole home (3–4 bedroom) | Full Wiser system, all rooms, outdoor lighting, motion sensors, automation scenes | $8,000–$18,000 |
| Switchboard upgrade (if required) | Pre-1990s homes, older fuse boxes, additional circuit capacity | $2,000–$5,000 |
These are real-world figures for Auckland in 2026, not best-case scenarios. Labour rates for licensed electricians sit at $90–$120 per hour — consistent with the broader Auckland trade market. If you’re mid-renovation and an electrician is already on site, you’ll save significantly on labour by adding smart lighting to the scope at that point rather than returning later.
Pull Points and Power Points — The Overlooked Detail
While the conversation is usually about switches and dimmers, it’s worth thinking about power point placement too. Benchtop power points in kitchens — the retractable kind that sit flush when not in use — have become one of the most requested features in Auckland kitchen renovations over the past few years. They’re practical, they look clean, and they’re significantly cheaper to install during a renovation than after.
The same logic applies to USB-C charging points in bedrooms, outdoor weatherproof power points for entertaining areas, and dedicated circuits for home office equipment. Think about where you actually use power in your home, and plan those positions before the gib goes on. An electrician making changes after lining is completed typically charges for each patch and repaint — costs that add up fast.
Smart Climate Control — Heating, Cooling and Ventilation for Auckland’s Climate
Auckland’s Climate Makes This Category Non-Negotiable
Auckland doesn’t get cold the way Christchurch or Queenstown does. It gets damp. The winters here are mild enough that people underestimate how much moisture does to an older, under-insulated home. Mould in bathrooms, condensation on windows, musty carpet in poorly ventilated bedrooms — these aren’t aesthetic problems. They’re health problems, and they’re common across Auckland’s older housing stock in suburbs like Glen Eden, Avondale, and Otahuhu where ventilation was never designed into the build.
Smart climate control — done properly — addresses all of this. It’s not just heat pumps on a timer. It’s an integrated approach to temperature, humidity, and air quality that you set once and largely forget.
Smart Heat Pump Control
Most modern heat pumps from Mitsubishi Electric, Panasonic, and Daikin — all widely available and well-serviced in New Zealand — have smart control capability built in or available as an add-on. A smart controller lets you set schedules, monitor energy use, and operate the unit remotely from your phone.
The practical benefit for Auckland homeowners isn’t turning the heat pump on from the couch. It’s setting it to warm the house to 19°C before you get out of bed on a July morning, then dropping back to 17°C while nobody’s home. Over a year, that kind of scheduling reduces energy consumption meaningfully. EECA research indicates that proper heat pump use can reduce heating costs by 25–40% compared to resistive heating alternatives — a significant saving in Auckland’s seven or eight months of heating season.
PDL Wiser’s IR Converter integrates directly with most heat pump brands, allowing control through the Wiser app without needing a separate system. For renovations where a new heat pump is being installed anyway, specifying a compatible unit from the start costs nothing extra.
Ventilation and Humidity — The Problem Most Systems Ignore
Heat is only part of the equation. Auckland homes — particularly those built before the updated H1 insulation requirements under the NZ Building Code — suffer from inadequate ventilation. When you renovate a bathroom, a kitchen, or seal up windows for double glazing, you often change the airflow patterns in a home without accounting for it.
Smart ventilation systems — including humidity-triggered bathroom extraction fans and heat recovery ventilators (HRV systems) — address this without the homeowner needing to manage it manually. A Healthy Homes-compliant bathroom fan is required by regulation in rental properties; for owner-occupied homes, the difference between a basic extract fan and a humidity-triggered smart fan is around $200–$400 per unit. Given that mould remediation in a wet Auckland bathroom starts at $1,500, it’s rarely a hard case to make.
Luxury Bathroom Design – Redvale
Underfloor Heating — Worth It in Bathrooms and Kitchens
Electric underfloor heating has become a standard inclusion in mid-range and above bathroom renovations in Auckland. It costs $800–$2,500 to install during a tiled bathroom renovation (the heating element goes in before the tiles, which is the only sensible time to do it). Running costs on a smart timer — set to warm the floor for 45 minutes before the alarm goes off — are minimal. Most systems draw 150W per square metre.
Smart thermostats for underfloor systems allow scheduling and remote control, meaning you’re not heating an empty bathroom on days you’re working from home or away. The key is specifying the thermostat at the time of renovation so the wiring is run correctly — retrofitting after tiling involves taking tiles up. Not a fun day for anyone.
💡 Quick tip: If you’re tiling a bathroom floor during your renovation, always run the conduit for underfloor heating — even if you’re not installing it now. The conduit costs less than $50 and means you can add the heating element years later without lifting a single tile.
Climate Control Budget Guide
| System | Approximate Cost (NZD incl. GST) | Best Time to Install |
|---|---|---|
| Smart heat pump controller (add-on to existing) | $200–$600 | Anytime |
| Bathroom underfloor heating (incl. smart thermostat) | $800–$2,500 | During tiling — not after |
| HRV / ventilation system (whole home) | $3,000–$6,000 | During renovation (ceiling access) |
| Smart humidity-triggered bathroom fans (per unit) | $350–$700 | During bathroom renovation |
| Wiser Temperature/Humidity Sensor (per room) | $150–$250 | Anytime (wireless device) |
“A bathroom renovation is one of the best opportunities to sort humidity properly. Most Auckland bathrooms we work on are extracting moisture too slowly, or not at all. Pairing a good extraction system with a humidity sensor means you’re not relying on people remembering to run the fan — it just happens. That’s what keeps mould out long-term.”
— Cici Zou, NZ Dip. Interior Design, Certified Designer, Superior Renovations
Smart Security, Motorised Blinds and Home Automation — The Layer Most People Overlook
Smart Security — What’s Actually Useful
Home security has an image problem. The marketing makes it sound like you need a control room and a monthly monitoring contract. Most Auckland homeowners don’t. What they actually want is reasonably simple: know who’s at the door without getting up, see what’s happening at the property when you’re away, and get an alert if something’s wrong.
A basic smart security setup during a renovation costs a fraction of a monitored alarm system and delivers most of the practical benefit. The PDL Wiser security range — which we spec for clients regularly — includes indoor and outdoor IP cameras, door and window sensors, and motion detectors that all feed back to the same Wiser app. No separate subscription. No extra hub.
The cameras deliver HD recording with motion tracking and alert on any detected movement. For Auckland homeowners who travel regularly or have a rental property on the same section, remote access to live camera feeds from a phone is the single feature they use most. A client in Glendowie with two properties on a combined site told us it changed how comfortable they felt leaving both places empty over summer.
What the Renovation Window Enables for Security
Retrofit security cameras are fine. But wired cameras — run during a renovation — are more reliable, don’t have battery management issues, and can be hidden more cleanly in eaves and ceiling spaces. The difference in appearance between a cleanly surface-mounted camera and one on a visible cable run down an external wall is significant, particularly on heritage-character homes in suburbs like Remuera or Parnell.
During a renovation, an electrician can run low-voltage cabling for cameras, door sensors, and intercom systems inside the wall cavity — invisible when the job’s done. The same goes for a smart doorbell with intercom capability: wired during the reno, it’s flush, clean, and powered without needing a battery change every few months.
💡 Quick tip: When planning camera positions, think about coverage angles before walls close. An electrician can stub out cable at any point — ceiling, soffit, exterior wall cavity — for almost nothing during rough-in. Deciding where cameras go after the fact is a visible, expensive problem.
Motorised Blinds — More Useful Than They Sound
Motorised blinds were a luxury product five years ago. The price has come down considerably. For Auckland west-facing living rooms — particularly the villas and bungalows in Grey Lynn, Westmere and Pt Chevalier that bake in afternoon sun — motorised blinds on a light sensor or schedule are genuinely practical. They close automatically when the sun hits the west-facing window at 2pm, keep the room cooler, reduce UV on furniture, and can integrate with your heat pump schedule to improve efficiency.
PDL Wiser’s Micro Module Blind Controller transforms any standard double push-button switch into a connected blind controller — no specialist blind system required. For homes where new blinds are being specified during a renovation anyway, adding motorisation is a relatively small incremental cost.
Budget: Motorised blind per window (mid-range system, installed) typically runs $400–$900 per blind depending on size and fabric. For a renovation where blinds are being replaced throughout, the motorisation premium per blind is often $150–$250 on top of the standard blind cost.
Multi-Room Audio
Pre-wiring for ceiling speakers during a renovation is one of the lowest-cost, highest-impact infrastructure decisions you can make. Speaker cable in a wall cavity costs almost nothing. Installing ceiling speakers after lining involves cutting holes, patching, and painting — trade time that adds up.
Sonos is the system most commonly specified in New Zealand renovations and is widely available here. The Sonos Amp connects to in-ceiling speakers and integrates with the broader smart home ecosystem, including voice control via Amazon Alexa and Google Home. A typical living area and kitchen zone — covering open-plan spaces common in Auckland renovation briefs — runs $1,500–$3,000 for a mid-range Sonos setup including installed ceiling speakers.

Superior Renovations
Smart Locks and Access Control
Smart locks — keypad or phone-based entry — have become a standard request for Auckland renovations involving front door replacements or new external doors in house extensions. The appeal is practical: no more hiding a spare key under a pot plant. Guests, cleaners, or tradespeople can be given a time-limited code. Access logs mean you know who came and went, and when.
Most smart locks in New Zealand — including Schlage and Yale models available from Mitre 10 and specialist suppliers — are retrofit-friendly. But if you’re installing a new front door as part of a renovation, specifying the lock prep and correct door bore at that stage avoids adapter issues later.
EV Charging, Network Infrastructure and Future-Proofing Your Auckland Home
EV Charging — The Upgrade With a Clear Payback Timeline
New Zealand had over 100,000 registered electric vehicles on the road by early 2026. In Auckland — where commuting distances, off-peak electricity rates, and the relative density of home garages make home charging the primary option — EV ownership has grown significantly. If you’re renovating and have a garage or carport, not thinking about EV charging infrastructure is a decision you’re likely to reverse in five years at higher cost.
A Level 2 home wallbox charger — the kind that can fully charge most EV batteries overnight — requires a dedicated 32-amp circuit and appropriate switchboard capacity. Installing that circuit during a renovation, when an electrician is already on site, typically costs $800–$1,800 depending on the run distance from your switchboard to the garage. Installing it later — after a wall is lined, a concrete path is poured, and trades need to be re-mobilised — can cost $2,500–$4,500 for the same outcome.
At current NZ electricity rates, EV owners with off-peak overnight charging plans from providers like Octopus Energy or Mercury pay roughly $0.12–$0.15 per kWh. A full charge on a typical family EV costs around $8–$12. Compare that to $90–$110 to fill a mid-size petrol SUV. The infrastructure investment pays back quickly for most Auckland households.
💡 Quick tip: Even if you don’t own an EV now, ask your electrician to stub out a 32-amp circuit to the garage during the renovation. Capping it off costs almost nothing and the circuit is there when you need it. Future buyers will notice it on a property inspection — it’s increasingly on the checklist.
Network Infrastructure — Wired Is Still Better
Wi-Fi has improved enormously. Mesh systems from vendors like TP-Link and Eero — both available in NZ — handle large homes much better than the single router of a decade ago.
But for smart home reliability, nothing beats a wired Cat6 Ethernet backbone. Wired access points don’t have interference issues, don’t compete with the microwave or the neighbours’ routers, and deliver consistent speeds regardless of how many devices are connected. For Auckland homes where remote work has become permanent and smart home devices are multiplying — cameras, speakers, thermostats, connected appliances — a wired backbone is the difference between a system that works reliably and one that doesn’t.
Running Cat6 cable during a renovation costs around $80–$150 per point for material and labour when done alongside other electrical work. Running it later involves cutting into lined walls. The maths is straightforward.
The key positions to wire: main router location (near the modem/ONT), living areas, home office, master bedroom, and any outdoor entertainment area. A six-point Cat6 installation during a renovation typically runs $800–$1,500 all in — easily the best value infrastructure investment in a home renovation.
Planning for Future Technology
Nobody can predict exactly what home technology looks like in 2030. But some trends are clear enough to plan for now.
Solar panels and home battery storage — already mainstream in New Zealand with products like Tesla Powerwall and Enphase — are increasingly being integrated into smart home systems. If solar is on your radar, the switchboard and metering setup during a renovation should be selected with solar in mind. Retrofitting the right inverter connections and export metering later is possible, but it’s easier and cheaper to leave the pathway clear from the start.
Home EV chargers with bidirectional capability — charging the car from the grid at night, sending power back to the home during peak demand — are available on newer EV models in 2026. This “Vehicle to Home” (V2H) technology requires specific charger and switchboard setup. Pre-wiring for it during a renovation positions your home for that upgrade without requiring a future electrician to work around completed finishes.
“We encourage every client doing a kitchen or full home renovation to think about where their garage is and what they’re going to want to park in it in five years. The conversation about EV charging infrastructure takes about five minutes. Not having it is a conversation that takes longer — usually after they’ve already moved back in.”
— Dorothy Li, Design Manager, Superior Renovations
The Complete Infrastructure Checklist for a Smart-Ready Renovation
| Item | Why It Matters | Approximate Cost During Reno |
|---|---|---|
| Switchboard upgrade (if pre-1990s) | Foundation for all smart systems and EV charging | $2,000–$5,000 |
| Cat6 cabling (6 points) | Reliable backbone for Wi-Fi access points and smart devices | $800–$1,500 |
| EV charging circuit to garage | Dedicated 32A circuit for home wallbox charger | $800–$1,800 |
| Speaker cable pre-wire (living/kitchen) | Enables clean in-ceiling audio without visible cable runs | $200–$500 |
| Security camera cable stubs | Hidden wired camera runs, no surface cable | $150–$400 per point |
| Underfloor heating conduit (bathrooms) | Enables heating element addition without tile removal | $30–$80 per bathroom |
| Solar-ready switchboard/metering setup | Pathway clear for future solar without rework | $300–$800 (marginal cost) |
The total for a comprehensive infrastructure package — covering most of the items above — sits in the $5,000–$10,000 range when completed alongside a renovation. Doing the same work in a completed home often runs $15,000–$20,000 for equivalent scope. The arithmetic is clear.
If you’re planning a home renovation in Auckland, talk to our team about incorporating smart home infrastructure into the design brief from the start. It costs almost nothing to plan well. It costs significantly more to fix later.
➡ Book your free in-home consultation with Superior Renovations
➡ Explore our home renovation services in Auckland
➡ Request a free feasibility report for your project
When is the best time to add smart home technology to my Auckland home?
During a renovation — before walls are lined and ceilings are closed. Running cabling, conduit, and circuits at this stage costs a fraction of what the same work costs in a completed home. Even if you're not ready to install smart devices immediately, stubbing out cable positions and running conduit during a renovation is cheap and preserves every future option.
How much does a smart home system cost in New Zealand?
A single-room smart lighting setup starts from around $1,500–$3,500 installed. A whole-home system covering lighting, climate, security, and motorised blinds in a three or four-bedroom Auckland home typically runs $15,000–$30,000. The cost depends heavily on scope and whether the home is being renovated (where infrastructure costs are lower) or retrofitted after completion.
Do I need a building consent to install smart home technology in Auckland?
Not for the smart devices themselves. However, any new electrical circuits — including those for EV charging, additional switchboard capacity, or hardwired camera systems — must be installed by a registered electrician and may require notification to Auckland Council under the Electricity Act. Your renovation company or electrician will advise based on the specific scope. See building.govt.nz for guidance on electrical consent requirements.
What is PDL Wiser and is it available in New Zealand?
PDL Wiser is a smart home automation system developed by PDL by Schneider Electric, specifically for the New Zealand and Pacific market. It uses Zigbee 3.0 and Bluetooth Low Energy, integrates with Amazon Alexa and Google Home, and is compatible with PDL's award-winning Iconic switch range — which looks like a standard switch. It's scalable, starting with a single room and expanding over time. Available throughout NZ including Auckland.
Can smart home technology be added to an older Auckland villa or bungalow?
Yes, though older homes (pre-1990s) often need a switchboard upgrade first — typically $2,000–$5,000 — to safely handle the additional load. PDL Wiser's Iconic Bluetooth switches require no special wiring and can be added to existing wiring systems, making them well-suited to heritage character homes in suburbs like Grey Lynn, Mt Eden, and Remuera where rewiring every circuit isn't practical.
How much does EV charger installation cost in Auckland?
Installing a Level 2 home wallbox charger during a renovation — when an electrician is already on site — typically costs $800–$1,800 including a dedicated 32-amp circuit. Doing the same work after a renovation is complete often runs $2,500–$4,500. The wallbox charger itself (not including installation) costs $600–$2,500 depending on the model and charging speed. Installation must be done by a licensed electrician.
Does smart home technology increase property value in Auckland?
Evidence from homes.co.nz and local real estate agents suggests smart-ready homes — particularly those with EV charging infrastructure, smart security, and energy management systems — are increasingly noted as positive features by Auckland buyers. Pre-wired and infrastructure-ready homes attract attention from buyers who want the lifestyle without the retrofit cost. In the $900,000+ market, smart infrastructure is becoming a differentiator rather than a novelty.
What smart home systems can I control with my phone?
Most modern NZ smart home systems — including PDL Wiser — are fully app-controlled. The Wiser by SE app lets you control lighting, climate, blinds, and security from anywhere with an internet connection. Compatibility with Amazon Alexa and Google Home enables voice control. For Apple users, some systems support Apple HomeKit, though compatibility varies — check with your installer before specifying.
Do I need a smart home hub?
For basic Bluetooth-only devices, no hub is required. For a whole-home system using Zigbee 3.0 — which provides longer range, better reliability, and true automation capability — a hub is required. The PDL Wiser Hub connects all devices and enables remote access via the app. It's a one-time cost, typically $150–$300, and sits in a cupboard or utility space.
Can I add smart home features to my renovation without changing everything at once?
Yes. This is one of the most practical aspects of modern NZ smart home systems. PDL Wiser is explicitly designed to be scalable — you can start with smart lighting in the kitchen or living room and add climate control, blinds, and security over subsequent years. The key is running the necessary cabling and conduit during the renovation so expansion is clean and cable-free later.
What should I ask my renovation company about smart home integration?
Ask: Will a licensed electrician be on site during rough-in? Can we run Cat6 cabling, speaker cable, and conduit stubs alongside the existing electrical scope? Is the switchboard adequate for additional smart home load? Can we add an EV charging circuit to the garage? Will smart switch positions be co-ordinated with the design layout? Asking these questions at the design stage adds minimal cost. Asking after the GIB goes on adds significant cost.
Further Resources for your home renovation
- Featured projects and Client stories to see specifications on some of the projects.
- Real client stories from Auckland homeowners
Need more information?
Take advantage of our FREE Complete Home Renovation Guide (48 pages), whether you’re already renovating or in the process of deciding to renovate, it’s not an easy process, this guide which includes a free 100+ point check list – will help you avoid costly mistakes.
Download Free Renovation Guide (PDF)
Still have questions unanswered?
Book a no-obligation consultation with the team at Superior Renovations,
we’d love to meet you to discuss your renovation ideas!
[contact-form-7]
Or call us on 0800 199 888
Have you been putting off getting renovations done?
We have partnered with Q Mastercard ® to provide you an 18 Month Interest-Free Payment Option, you can enjoy your new home now and stress less.
Learn More about Interest-Free Payment Options*
*Lending criteria, fees, terms and conditions apply. Mastercard is a registered trademark and the circles design is a trademark of Mastercard International Incorporated.
The post Smart Home Integration Auckland: What to Plan During Your Reno appeared first on Superior Renovations. #superiorrenovations


Comments
Post a Comment