Stages of a Kitchen Renovation in Auckland (2026)
Originally posted on Stages of a Kitchen Renovation in Auckland (2026)
Superior Renovations - Auckland’s Trusted Home Renovation Specialists
Stages of a Kitchen Renovation: What Actually Happens From Start to Finish
Quick answer: A kitchen renovation in Auckland follows six main stages — consultation, design, pre-construction (including consent if needed), demolition, construction and installation, and final handover. The full process takes 5–6 weeks on site, plus 4–8 weeks of design and manufacturing lead time beforehand.
Most Auckland homeowners who contact us about a kitchen reno have the same question: “What’s the actual process?” Not the pretty Instagram version. The real one — the part where your house smells like plaster dust, there’s no running water at the sink for three days, and you’re cooking dinner on a camp stove in the garage.
We’ve renovated hundreds of kitchens across Auckland since 2017, from villas in Grey Lynn with original 1920s sculleries to 1990s brick-and-tile places in Pakuranga where the melamine cabinets have finally given up. Every kitchen project is different in scope, but the stages are remarkably consistent. Knowing what happens at each one — and roughly when — takes most of the stress out of the experience.
This is the process we follow at Superior Renovations for every kitchen we take on. We’ll walk through each stage in order: what happens, how long it takes, what it costs, and what you should be doing at each point. No fluff. Just the stuff you’ll wish you’d known before demo day.
One thing worth flagging upfront: we focus on full kitchen renovations — gut-and-rebuild jobs, open-plan conversions, complete layout redesigns. If you’re just swapping a benchtop or putting in a new rangehood, this guide will still be useful for understanding the broader process, but that’s not what our team does day to day.
Stage 1 — Consultation and Scope: Getting Clear on What You Want
This is where everything starts, and it’s the stage most people underestimate. You might think the consultation is just a meet-and-greet. It’s not. A good initial consultation sets the scope, budget range, and feasibility for the entire project — get it wrong here and you’ll pay for it later.
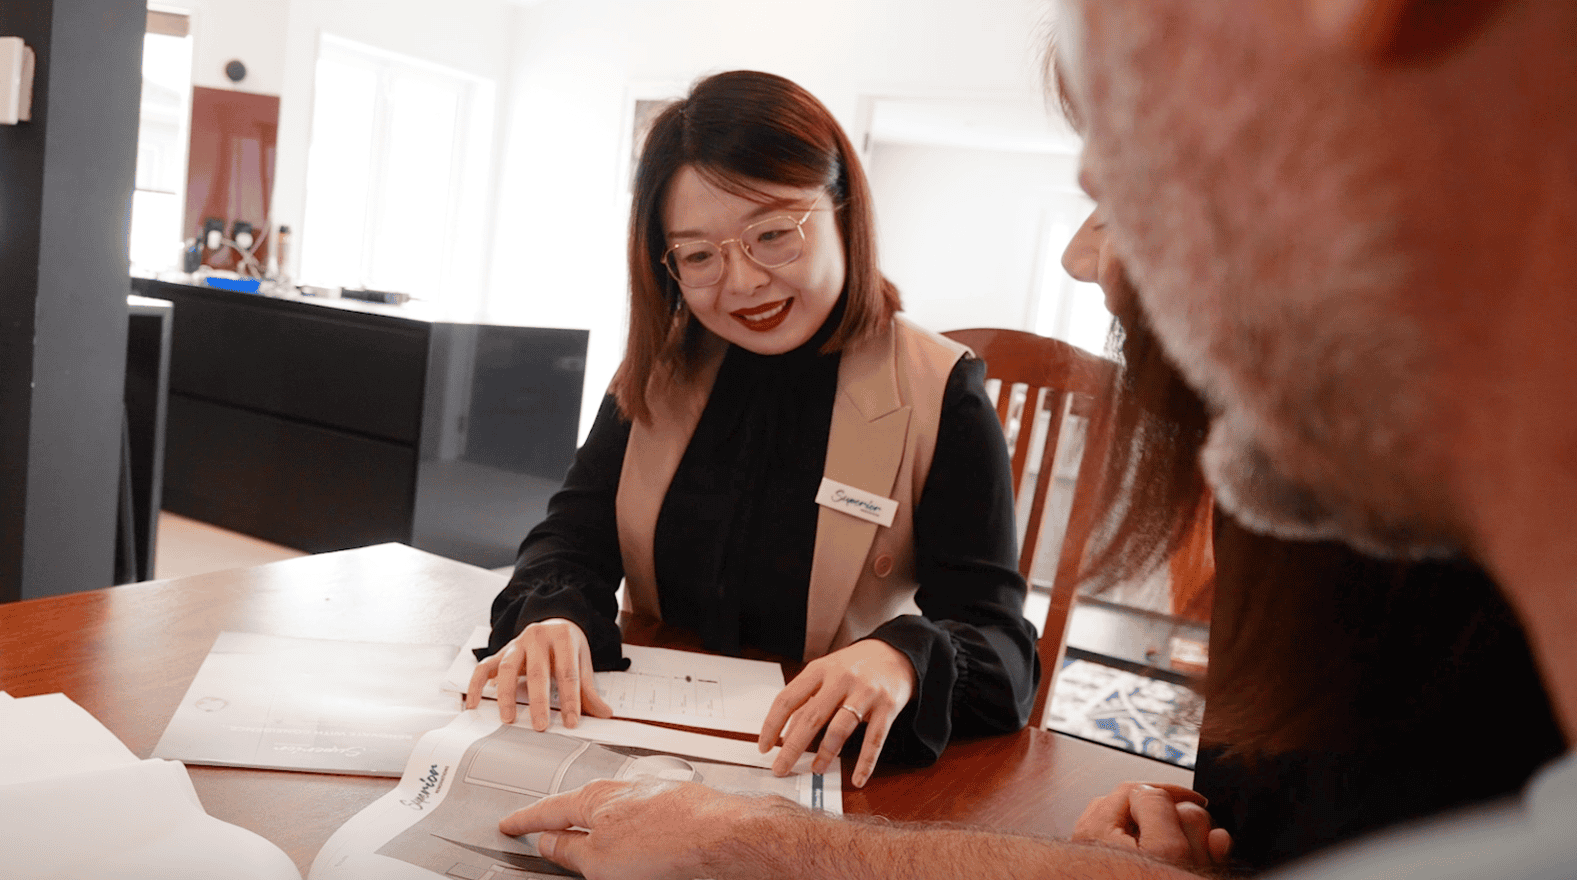
What Happens During the In-Home Consultation
At Superior Renovations, the first step is a free in-home consultation. One of our team visits your property, walks through the existing kitchen with you, and talks about what you’re after. We’re looking at a few things:
The current layout — where’s the sink, the cooktop, the fridge? Is the workflow functional, or are you walking 4 metres every time you need to drain pasta? We’re also looking at structural clues. Older Auckland homes — particularly pre-1960s villas and bungalows in areas like Mt Eden, Kingsland, or Devonport — often have kitchens tucked away at the back of the house with load-bearing walls between the kitchen and living area. That matters because removing a load-bearing wall adds structural engineering, consent, and a steel beam to the project.
We’ll talk about your wish list, your must-haves, and your budget. Being upfront about budget is the single most useful thing you can do at this stage. If you’ve got $30,000 to spend, we can design a great kitchen. If you’ve got $90,000, we can design a different great kitchen. But we need to know the number to make it work properly.
💡 Quick tip: Before your consultation, take ten minutes to photograph your current kitchen from each corner. Note down what frustrates you most — it might be lack of bench space, poor lighting, or a layout that blocks traffic flow. These details save time for your designer.
Setting a Realistic Kitchen Renovation Budget in Auckland
Based on completed projects in Auckland, here’s where the numbers sit in 2026:
| Renovation Level | Typical Cost (NZD + GST) | What’s Included |
|---|---|---|
| Budget refresh | $15,000–$25,000 | Pre-made cabinets, laminate benchtops, no layout changes |
| Mid-range full renovation | $30,000–$50,000 | Custom cabinets, stone benchtops, appliance upgrade, minor layout tweaks |
| Luxury / custom | $90,000–$138,000+ | Premium materials, island bench, smart features, full layout redesign |
Auckland prices typically run 10–20% above the national average, driven by higher labour rates ($120–$150/hour) and compliance costs. Always factor in a 10–15% contingency — especially if your home was built before 1980. You’d be surprised how often we open up a wall in a Pt Chevalier bungalow and find something that wasn’t in the plans.
For a personalised estimate, try our kitchen renovation cost calculator. It takes less than 60 seconds.
“The biggest mistake I see is homeowners locking in their heart on a specific look before understanding their budget. If we know the number early, we can steer material choices so the design actually delivers — instead of having to strip things back halfway through.”
— Alison Yu, Designer, Superior Renovations
What to Prepare Before Your First Meeting
Come with a rough budget range, a few photos of kitchens you like (Pinterest, Houzz, Instagram — wherever), and a list of what isn’t working in your current kitchen. If you’ve had any previous building work done on the property, dig out the plans or LIM report. That information speeds up the scoping process significantly.
After the consultation, we’ll follow up with a written project brief and an indicative cost range. This isn’t a binding quote — it’s a realistic picture of what your project will cost so you can decide whether to move forward into the design stage. No surprises.
Stage 2 — Kitchen Design and Material Selection
This is where your kitchen starts to exist — on screen, at least. The design stage is where every decision gets made that will affect how your kitchen looks, functions, and costs. Changes here are free. Changes once the builders are on site are not.
Working With a Designer at the Showroom
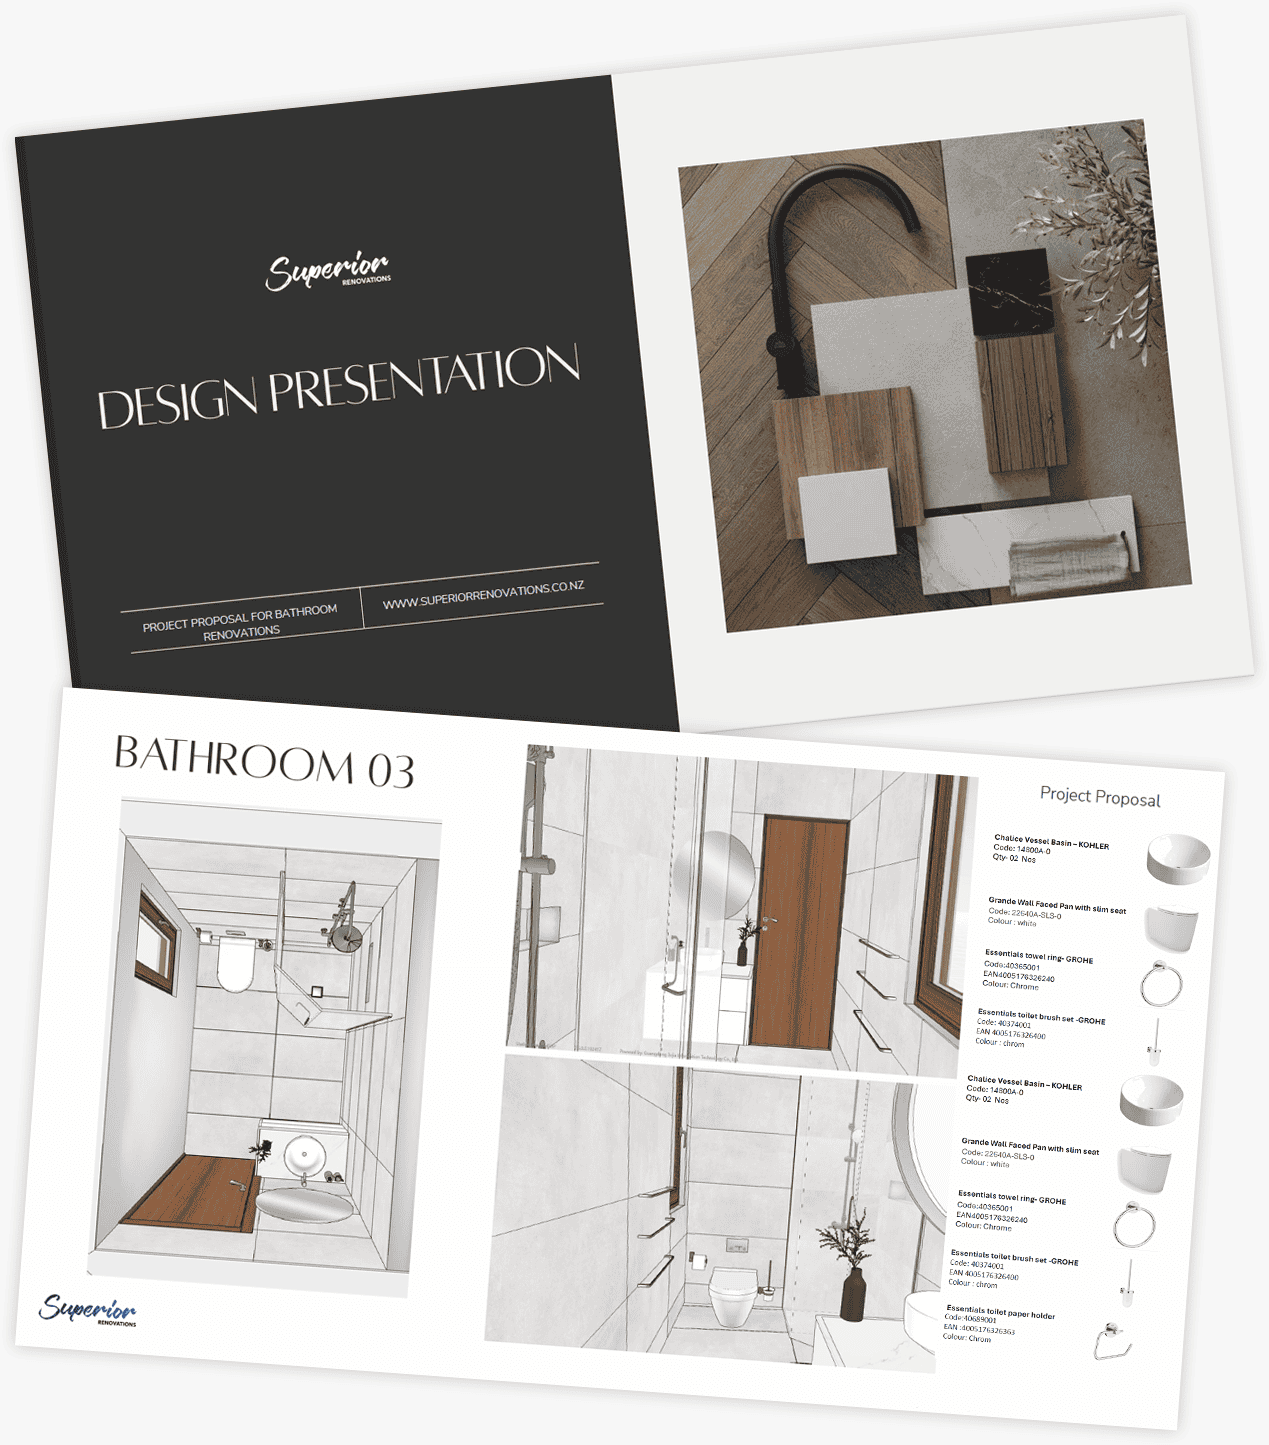
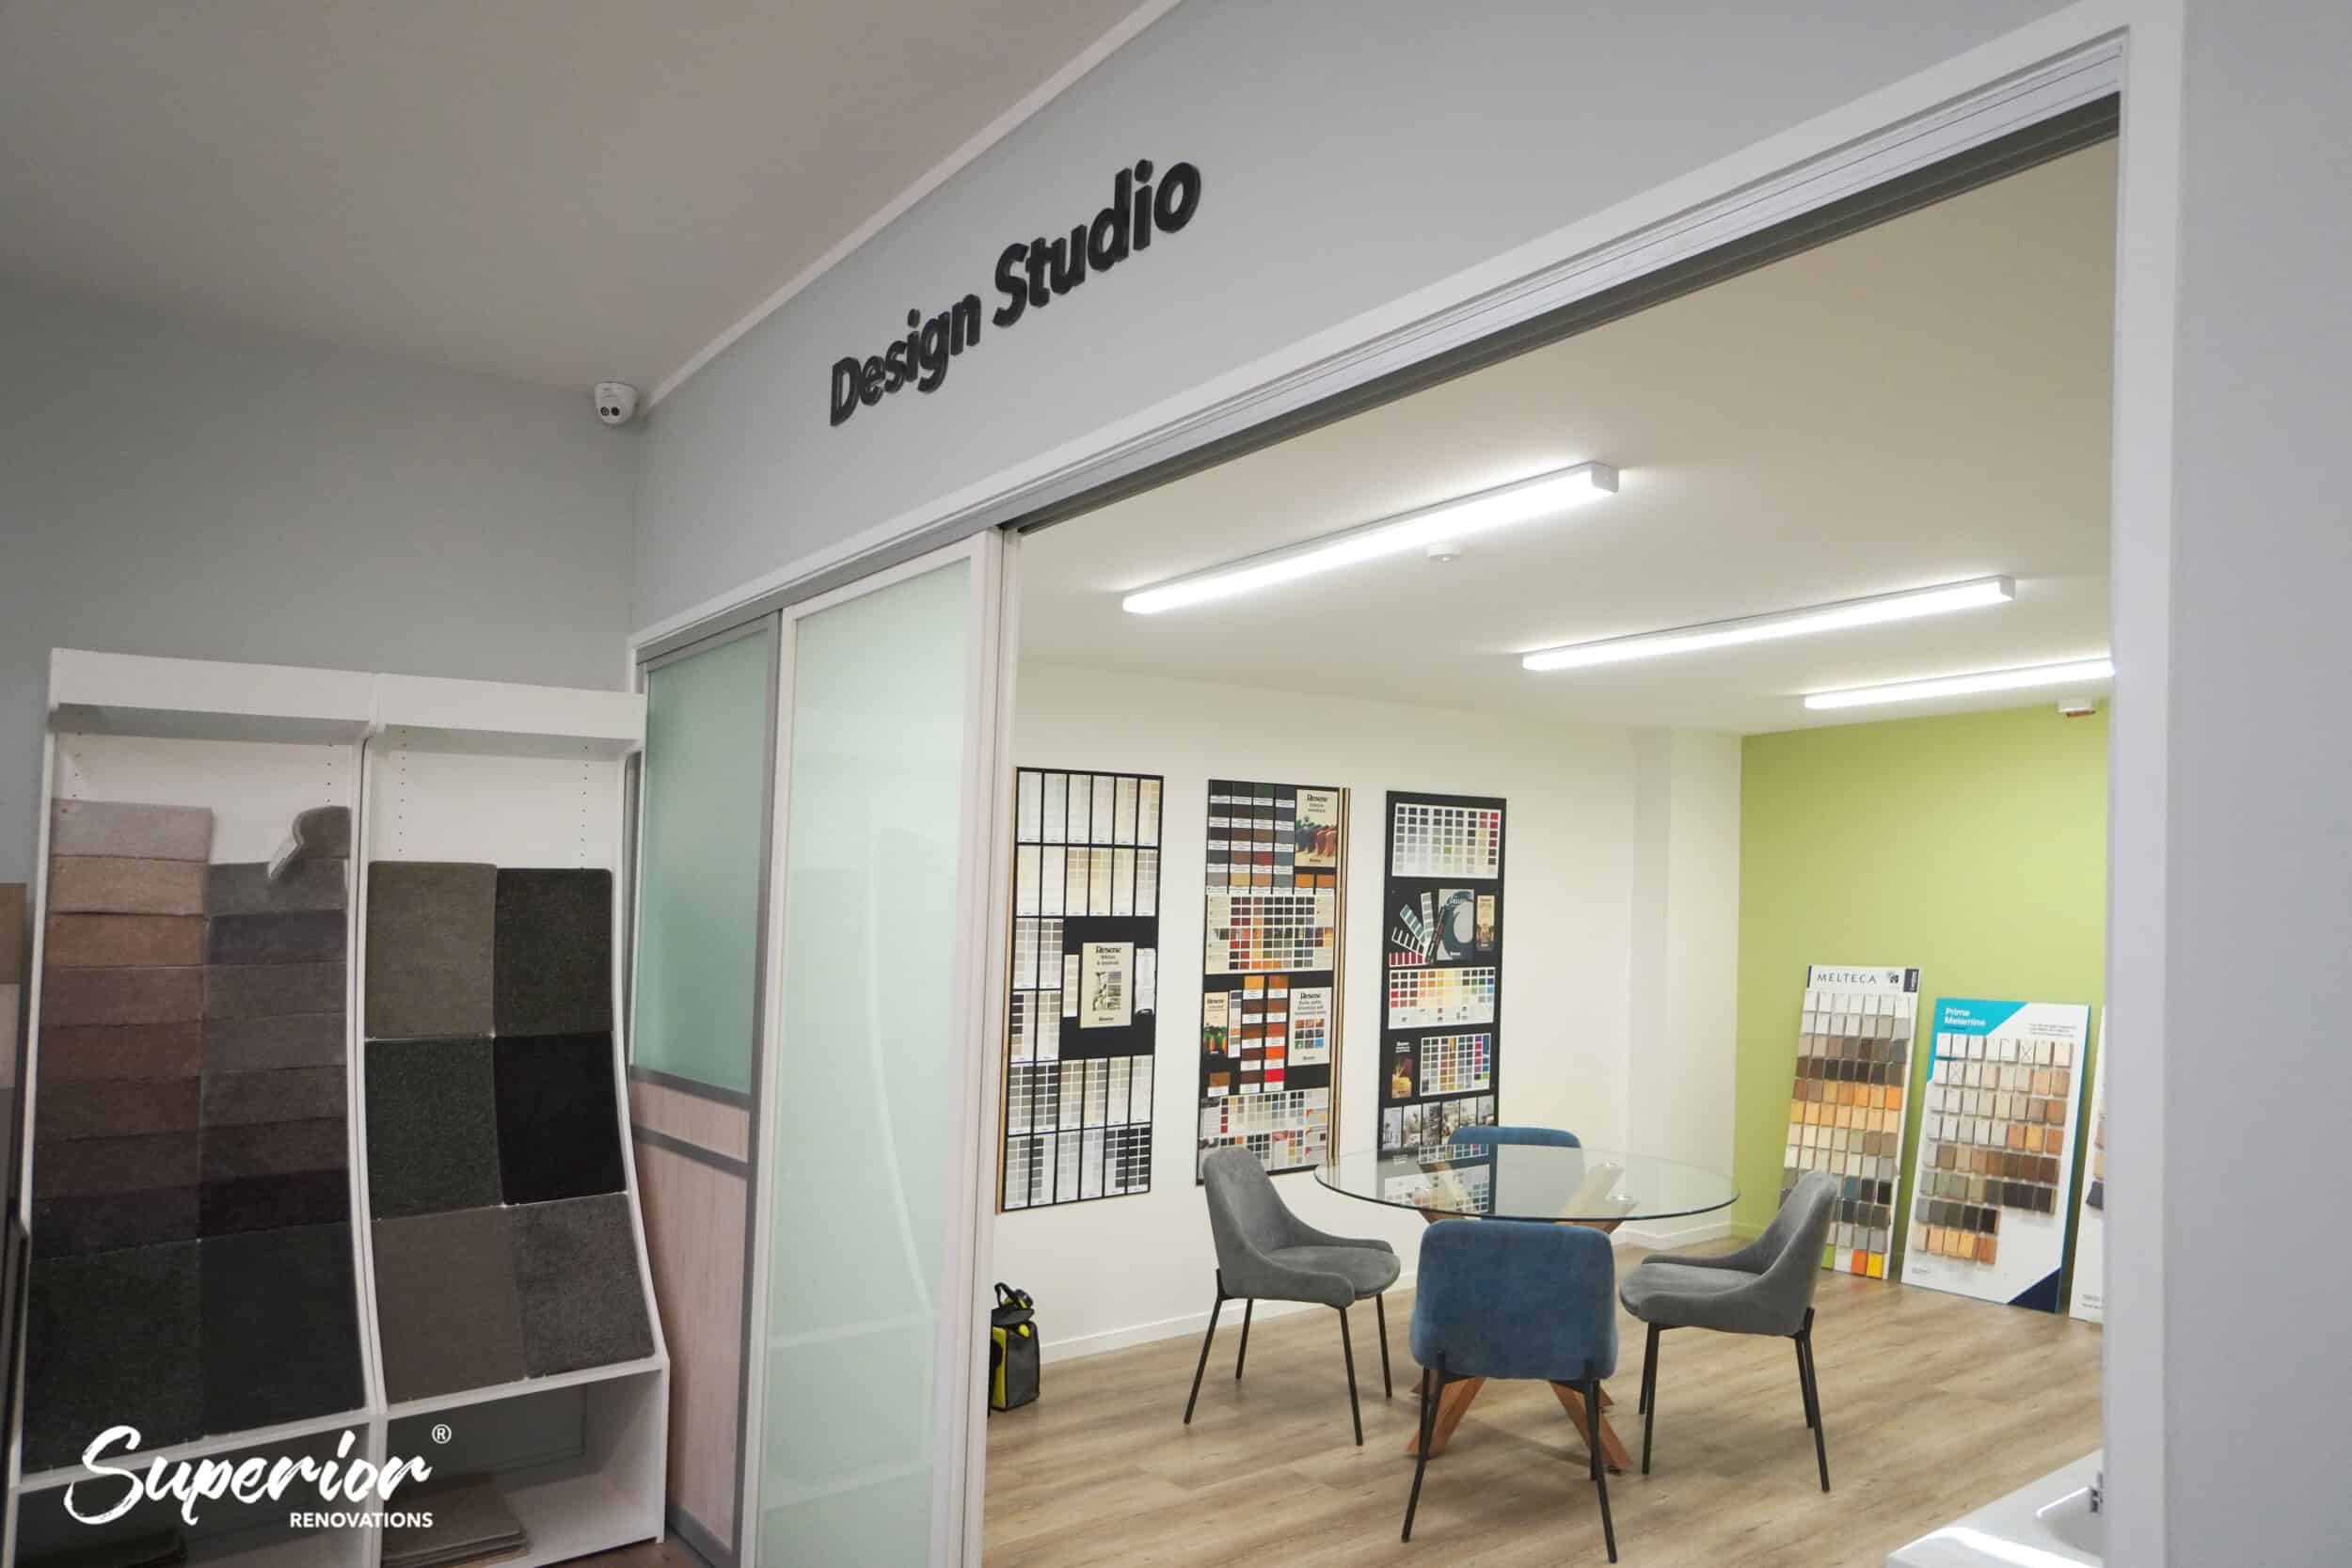
Once you’ve committed to moving forward, you’ll work with one of our designers at the Superior Renovations showroom in Wairau Valley (16B Link Drive). This is a hands-on session — you’re looking at actual materials, touching benchtop samples, opening cabinet drawers, and seeing how different handle profiles feel in your hand.
The designer develops a full kitchen layout based on your consultation brief. This includes cabinet placement, appliance positions, electrical and plumbing points, lighting, storage, and workflow. We generate 3D renders so you can see exactly what the finished kitchen will look like — not a rough sketch, but a realistic visualisation with your chosen colours, materials, and fittings.
Why does this matter? Because a $2,500 design investment can save you $10,000+ in construction changes. Moving a sink 600mm during the design phase costs nothing. Moving it after the plumber has already roughed-in the pipes costs real money.
💡 Quick tip: Ask your designer to walk you through the “work triangle” — the path between your sink, cooktop, and fridge. If that triangle is too stretched or too cramped, you’ll feel it every time you cook. A well-designed kitchen makes the 6pm dinner rush feel manageable, not chaotic.
Choosing Materials That Work for Auckland Conditions
Material selection sounds straightforward until you’re standing in front of 40 benchtop samples. Here’s the shortcut: think about how your family actually uses the kitchen.
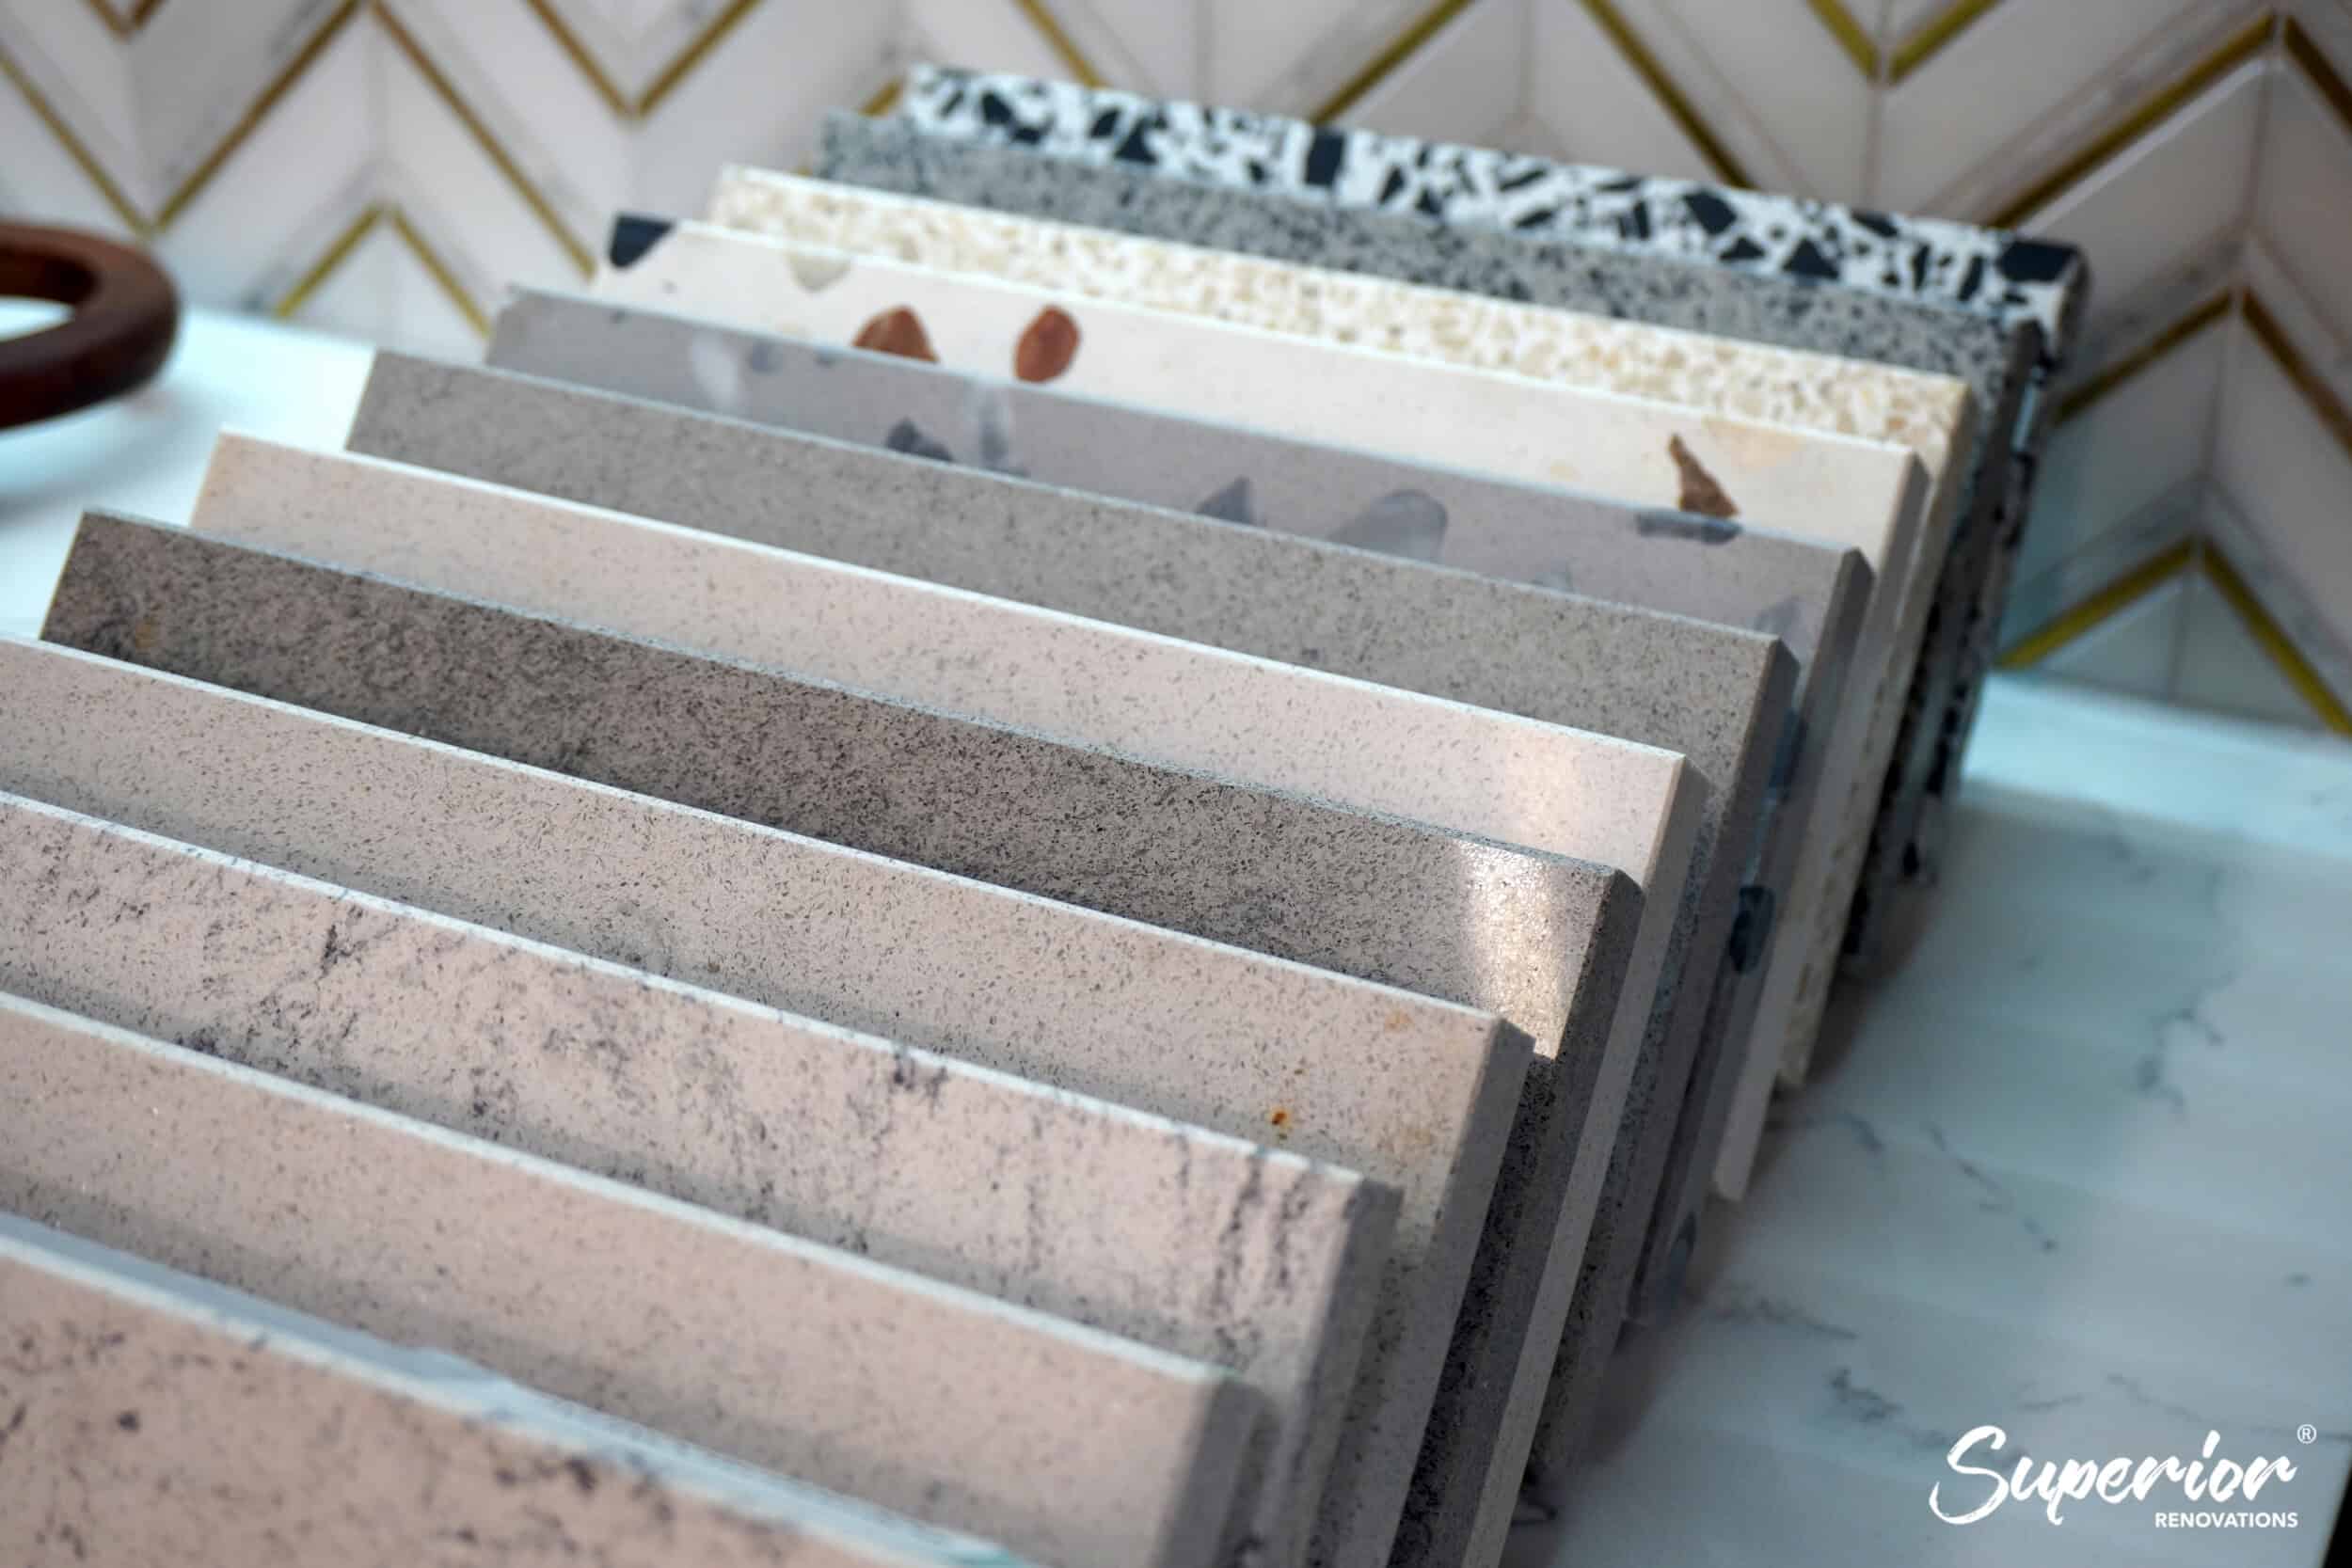
Benchtops — Engineered stone (brands like Caesarstone or Smartstone) is the most popular choice for mid-range Auckland kitchens. It handles heat, stains, and daily abuse. Laminate (Laminex or Melteca) is the budget-friendly option and looks far better than it did ten years ago.
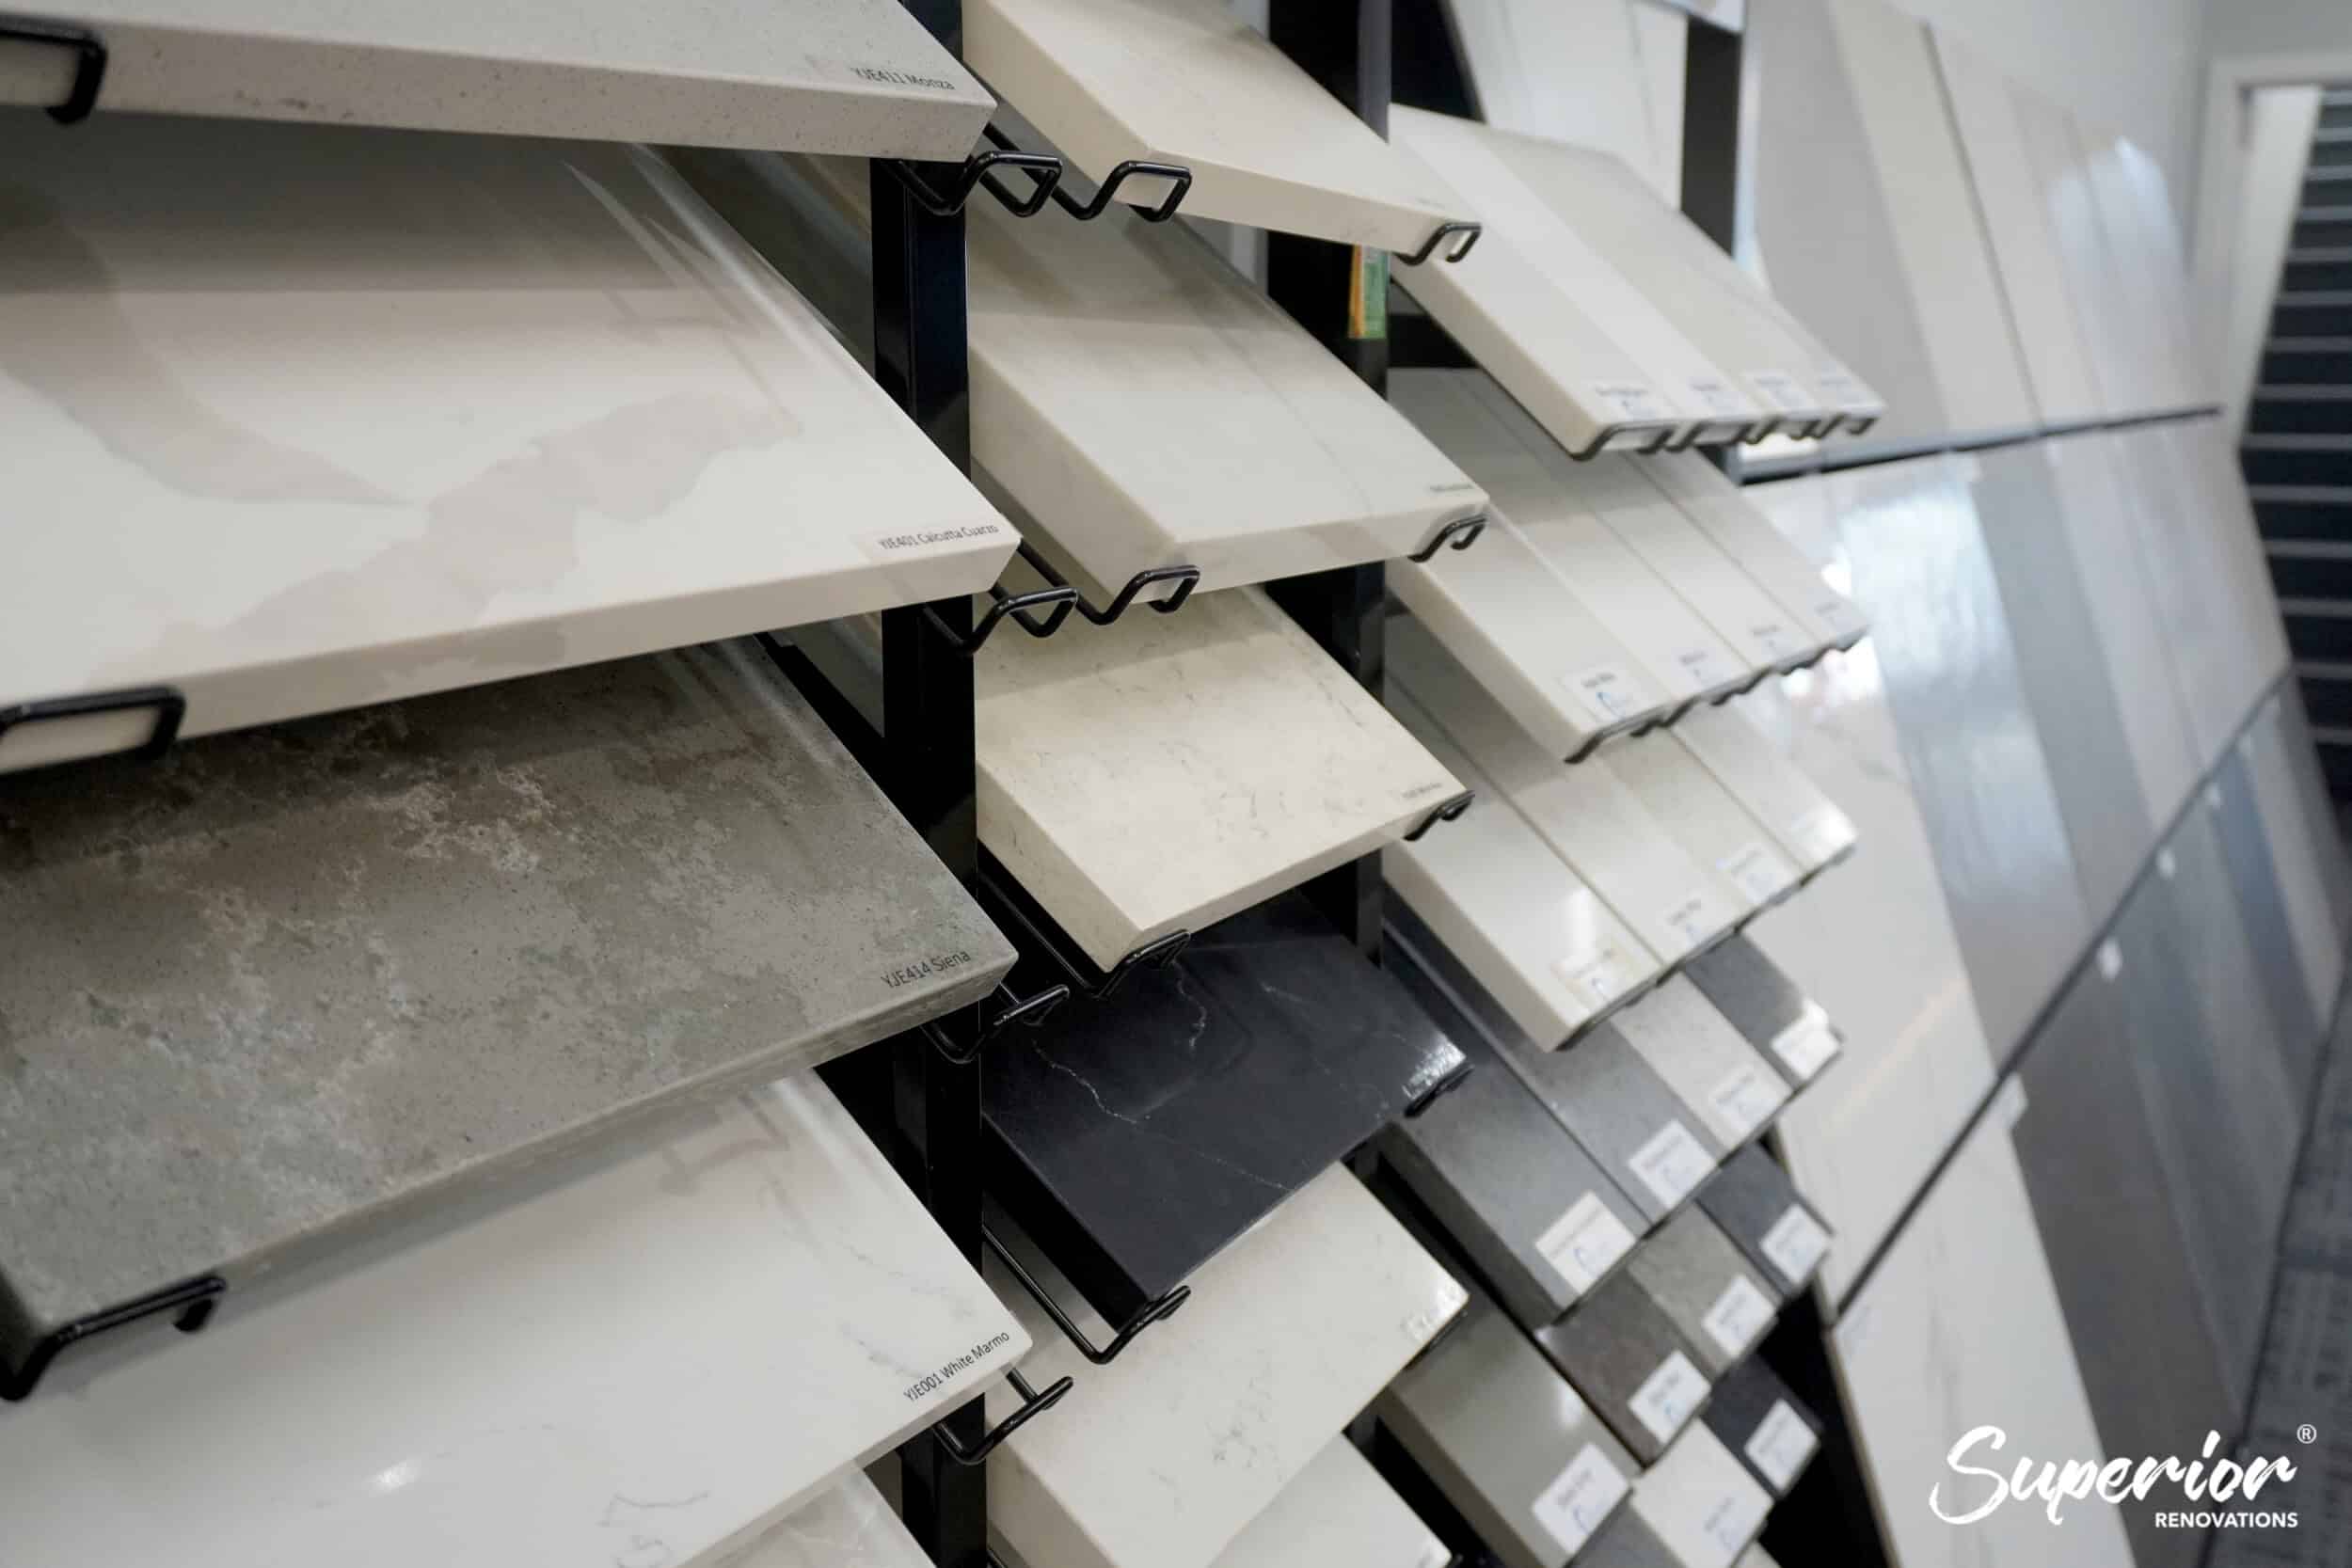
Cabinetry — This is the single largest cost item, typically 35–45% of the total budget. Custom cabinets give you control over dimensions, internal fittings, and finish. Pre-made flat-pack options from Mitre 10 or Bunnings work for budget projects but won’t fit irregular wall lines — common in older Auckland homes.
Splashbacks — Tiled, glass, or acrylic. Tiled splashbacks from suppliers like The Tile Depot offer the widest range of looks. Glass and acrylic require manufacturing lead time (usually 2–3 weeks) and are installed after the main build.
Appliances and fixtures — Sink, tap, rangehood, oven, cooktop, dishwasher. These need to be selected and ordered during the design stage because their exact dimensions affect the cabinet design. A 900mm rangehood needs a different cabinet opening than a 600mm one. Get this wrong and you’re re-manufacturing cabinetry.
How Long Does the Design Stage Take?
Allow 2–4 weeks for design and material selection. Faster if you’re decisive about finishes. Slower if you want to explore multiple layout options or if your project involves structural changes that need architectural input — in which case, we’ll bring in Sonder Architecture for the structural design and consent drawings.
At the end of this stage, you’ll have a finalised design, a full materials list, and a detailed fixed-price quote with a payment schedule and construction timeline. This is the point where you sign the contract.
“I always tell clients — spend the time here. Every hour in the design stage saves three hours on site. Once we’ve got the 3D render locked in and the materials ordered, the build phase runs like clockwork.”
— Dorothy Li, Design Manager, Superior Renovations
Stage 3 — Pre-Construction: Consent, Manufacturing, and Preparation
This is the behind-the-scenes stage. You won’t see tradies on site yet, but a lot is happening. The pre-construction phase is where your design gets turned into physical components — and where any council consent gets processed.
Do You Need a Building Consent for a Kitchen Renovation in Auckland?
Short answer: probably not — but it depends on your scope.
Most kitchen renovations that keep the existing layout don’t require Auckland Council building consent. Replacing cabinetry, benchtops, appliances, flooring, and finishes in the same positions falls under exempt work. You’re free to go ahead without a consent application.
Consent is required if your project involves:
Removing or altering a load-bearing wall — this is the most common consent trigger in Auckland kitchen renovations, especially open-plan conversions where the kitchen wall comes down to connect with the living/dining area. Relocating plumbing to a new position — moving the sink to an island bench, for example, typically requires consent because it alters the drainage layout. Adding new electrical circuits beyond standard replacements — additional wiring for an induction cooktop or dedicated appliance circuits may trigger consent depending on scope.
According to Auckland Council’s guidance on kitchen renovations, you can remodel an existing kitchen within the same space without consent — provided you’re leaving the sink in the same position and using authorised tradespeople for plumbing and electrical work.
If consent is required, our team handles the full application — drawings, structural engineering (via Sonder Architecture), council submission, and follow-up. Auckland Council consent processing currently takes 20 working days for straightforward residential applications, though complex projects can take longer.
💡 Quick tip: If your project needs consent, don’t wait until the consent is granted to start ordering materials. Your designer can run the material ordering and consent application in parallel — so by the time consent comes through, your cabinetry is already in the manufacturing queue. That saves weeks.
Cabinet Manufacturing and Material Ordering
Once the design is signed off and the contract is in place, the project moves to manufacturing. Your cabinetry is booked into the manufacturing schedule, and all materials, hardware, fixtures, and fittings are ordered from suppliers.
Cabinet manufacturing typically takes 4–6 weeks depending on complexity and the manufacturer’s schedule. Stone benchtops need to be templated after cabinets are installed (they’re cut to fit the actual installed dimensions, not the design drawings), so they arrive separately — usually 1–2 weeks after cabinet installation.
During this period, your project manager will confirm the construction start date, finalise the build sequence, and coordinate all trades — plumber, electrician, tiler, builder, painter, installer. Everything gets scheduled so each trade arrives at the right time, in the right order.
Preparing Your Home for the Kitchen Build
A week or two before demolition, you’ll need to set up a temporary kitchen. This sounds minor, but it makes a real difference to how tolerable the next 5–6 weeks are. Most of our Auckland clients set up a trestle table with a microwave, electric jug, and a portable induction cooktop in the garage, spare room, or dining area.
Clear the existing kitchen completely before demo day. Everything out of the cabinets, off the shelves, out of the drawers. Appliances disconnected. The demo team works fast — they don’t want to be carefully packing away your grandmother’s china while they’re pulling out cabinetry.
Stage 4 — Demolition and Site Preparation
Demo day. This is when the old kitchen comes out. It’s loud, it’s dusty, and it happens fast.
What Gets Removed During Kitchen Demolition
Old cabinets, benchtops, splashback, flooring, and appliances are stripped out completely. In a full kitchen renovation, we’re taking everything back to bare walls and floor — sometimes further. If we’re opening up into an adjacent room, the dividing wall comes down at this stage too (with structural support already in place if it’s load-bearing).
Demolition for a standard kitchen takes 1–2 days. If structural work is involved — steel beams, header installation, foundation adjustments — add another 2–3 days. The demo crew will protect adjacent rooms with dust barriers and floor protection, but fair warning: renovation dust finds its way everywhere. Close bedroom doors and cover furniture in adjacent rooms.
What Happens After the Old Kitchen is Out
This is the stage most homeowners don’t think about, and it’s where hidden issues surface. Once the old kitchen is gone, the walls and floor are exposed. In older Auckland homes — particularly anything built before 1970 — we commonly find water damage behind the sink, inadequate electrical wiring, outdated plumbing, or framing that doesn’t meet current code.
A client in Hillsborough had us renovate their 1960s kitchen last year. Behind the old wall-mounted cabinets, we found the GIB had been nailed directly to the framing with no moisture barrier — the bottom plate was damp and soft. That framing needed replacing before the new kitchen could go in. It added $3,500 and four days to the project. That’s what your contingency budget is for.
Once the space is cleared and any remedial work is complete:
Rough-in plumbing — the plumber installs pipework for the new sink position, dishwasher, and any other water connections. All plumbing must be done by an authorised tradesperson under Schedule 1 of the Building Act 2004. Rough-in electrical — the electrician wires new circuits, power points, and lighting positions according to the design plan. If you’re upgrading to an induction cooktop, you’ll need a dedicated circuit. Wall and floor preparation — GIB repair or replacement, plastering, levelling, waterproofing where required.
💡 Quick tip: If you’re living in the house during the renovation, arrange to be out on demo day and the day after. The noise, dust, and disruption are at their worst during this stage. After that, it settles into a steady build rhythm.
Stage 5 — Construction, Installation, and Finishing
This is the main event. The stage where your kitchen gets built.
Cabinet Installation
Once the site is prepped and all rough-in work is signed off, cabinet installation begins. Delivery is timed to line up with the installation date — we don’t want cabinetry sitting in your hallway for two weeks getting scratched.
Installation typically takes 2–3 days for a standard kitchen. The cabinets go in first — base units, wall units, pantry, island bench carcass. Everything is levelled, shimmed, and secured. This has to be precise because the benchtop, splashback, and appliances all reference off the cabinet positions. A cabinet that’s 5mm out will show once the stone benchtop goes on.
Benchtop Templating and Installation
If you’ve chosen engineered stone or natural stone, the benchtop supplier comes in after cabinet installation to template. They’ll laser-measure the exact dimensions of your installed cabinets — including sink cutout, cooktop cutout, and any joins. The stone is then cut and polished off-site, which takes 5–10 working days.
Laminate benchtops are typically manufactured before installation and delivered ready to fit. They go in faster — usually same day as cabinet install or the day after.
Plumbing, Electrical, and Appliance Fit-Off
Once the benchtop is in, the final connections happen. The plumber fits the sink and tap, connects the dishwasher, and tests all water connections. The electrician connects the oven, cooktop, rangehood, and any under-cabinet or pendant lighting. This fit-off stage typically takes 1–2 days.
Appliances need to be on site before the fit-off date. If you’re supplying your own appliances, make sure they’re delivered to your home at least a week before the scheduled fit-off — don’t assume courier timelines will cooperate. We’ve had jobs delayed because a client’s oven was sitting in a warehouse in Hamilton waiting for a delivery slot.
Splashback, Tiling, Flooring, and Paint
Splashbacks go in after the benchtop is installed — they sit on top of the bench surface and run up to the wall cabinets. Glass and acrylic splashbacks require manufacturing lead time (ordered earlier in the process) and are installed as a single panel. Tiled splashbacks are laid by a tiler on site — this takes 1–2 days including grouting and drying time.
Flooring is typically laid after cabinet installation — it runs up to the cabinet bases, and kickboards are fitted last to cover the join. Luxury vinyl plank (LVP) is the most popular flooring choice in Auckland kitchen renovations right now — it’s warm underfoot, water-resistant, and handles heavy traffic. Tiles are the other common option, especially for open-plan spaces where the kitchen floor continues into the living area.
Painting is the last step inside the kitchen — walls and ceiling get a final coat after all trades have finished. Your painter works around the installed cabinetry, benchtop, and splashback.
“The order of trades matters more than most people realise. Plumber before cabinets. Cabinets before benchtop. Benchtop before splashback. Painter last. When that sequence gets disrupted — because materials are late, or a trade doesn’t show up on the right day — the whole schedule shifts. That’s why we use a dedicated project manager on every kitchen.”
— Cici Zou, Designer (NZ Dip. Interior Design, Certified Designer), Superior Renovations
💡 Quick tip: Don’t choose paint colours until the benchtop and cabinetry are installed. Colours look different against real surfaces than they do on a screen. Grab a few Resene test pots and paint A4-sized swatches on the wall next to your new cabinets — check them in morning light and evening light before committing.
Stage 6 — Handover, Inspection, and Aftercare
The finish line. But not quite the way most people picture it.
The Final Walk-Through
Before we hand over the kitchen, your project manager walks through the completed space with you. Every element is checked — cabinet doors and drawers (do they open, close, and align properly?), benchtop finish, appliance operation, plumbing (run every tap, flush every connection), electrical (every power point and light switch), splashback joins, flooring, paint.
This is a detailed inspection, not a casual look. If anything needs attention — a drawer runner that’s slightly stiff, a paint touch-up behind the oven, a silicone bead that isn’t clean — it goes on a snag list and gets sorted before the final sign-off.
What a Typical Kitchen Renovation Timeline Looks Like
Here’s the full timeline from first contact to handover, based on a mid-range Auckland kitchen renovation without consent:
| Stage | Duration | Notes |
|---|---|---|
| Consultation | 1–2 weeks | In-home visit, project brief, indicative cost range |
| Design and material selection | 2–4 weeks | Showroom sessions, 3D renders, final quote |
| Manufacturing and ordering | 4–6 weeks | Cabinetry manufacture, materials ordered |
| Demolition and site prep | 3–5 days | Strip-out, rough-in plumbing and electrical |
| Construction and installation | 3–4 weeks | Cabinets, benchtop, splashback, flooring, paint |
| Handover and inspection | 1–2 days | Walk-through, snag list, sign-off |
| Total (no consent) | ~12–16 weeks | Add 4–8 weeks if consent required |
Warranties and Aftercare
Your kitchen renovation is covered by a workmanship guarantee from Superior Renovations, plus individual manufacturer warranties on products, appliances, and fixtures. The cabinetry, benchtop, and splashback all have separate manufacturer warranties — your project manager will hand these over at completion along with care and maintenance instructions.
If anything comes up after handover — a soft-close hinge that needs adjusting six months later, a question about cleaning stone benchtops — our aftercare team is available. That’s part of the service. We’ve built kitchens across Auckland for years and we want them to stay in great condition.
For details on how we manage the full renovation experience — from design through to aftercare — see our Our Promise page or read what our clients have to say in their own words.
How to Get Through a Kitchen Renovation Without Losing Your Mind
We’ve watched hundreds of Auckland families go through this process. The ones who have the best experience tend to do a few things the same way.
Accept that the first week is the worst. Demo day is loud and messy. The house feels chaotic. Your temporary kitchen setup is annoying. That’s normal. By week two, the build has a rhythm and you’ll barely notice the crew is there.
Stay in regular contact with your project manager — not with the tradies directly. The project manager is the single point of communication for a reason: they coordinate everyone, track the schedule, and flag any issues before they become problems. At Superior Renovations, your PM keeps you updated throughout, so you always know what’s happening and what’s next.
Don’t make design changes once construction starts. Seriously. Moving a power point after the electrician has already wired it adds cost and delays. The design stage exists for exactly this reason — make every decision there, and the build stage runs smoothly.
And finally — it’s worth it. Every client we’ve worked with says the same thing about three weeks after handover: “I should have done this years ago.”
➡ Book your free in-home consultation with Superior Renovations
➡ Try our free kitchen renovation cost calculator
➡ Request a free feasibility report for your project
What are the main stages of a kitchen renovation?
A kitchen renovation follows six main stages: consultation and scoping, design and material selection, pre-construction (consent, manufacturing, ordering), demolition and site preparation, construction and installation, and final handover and inspection. The full process takes approximately 12–16 weeks from first consultation to completion for a standard Auckland kitchen renovation without consent.
How long does a kitchen renovation take in Auckland?
A standard kitchen renovation takes 5–6 weeks from demolition day, assuming the design is finalised and cabinetry has been manufactured beforehand. Including the design stage (2–4 weeks) and manufacturing lead time (4–6 weeks), the total process from first consultation to handover is typically 12–16 weeks. If consent is required, add 4–8 weeks for Auckland Council processing.
How much does a kitchen renovation cost in Auckland in 2026?
In Auckland in 2026, a budget kitchen refresh starts from $15,000–$25,000. A mid-range full renovation with custom cabinets and stone benchtops runs $30,000–$50,000. Luxury and custom kitchens with premium materials and full layout redesigns range from $90,000 to $138,000+. Auckland prices are typically 10–20% above the national average due to higher labour rates ($120–$150/hour).
Do I need a building consent for a kitchen renovation in NZ?
Most kitchen renovations that keep the existing layout do not require Auckland Council building consent. Consent is required if you are removing a load-bearing wall, relocating plumbing to a new position, or making significant electrical changes. According to Auckland Council, you can remodel a kitchen within the same space without consent if the sink stays in the same position and authorised tradespeople do the plumbing and electrical work.
What is the most expensive part of a kitchen renovation?
Cabinetry is typically the most expensive component, accounting for 35–45% of the total budget. In a mid-range Auckland kitchen, expect to spend $10,000–$20,000 on cabinetry alone. Other significant costs include stone benchtops ($3,000–$8,000), appliances ($3,000–$10,000+), and labour for plumbing, electrical, and installation trades.
Can I live in my house during a kitchen renovation?
Yes — most Auckland homeowners stay in their home during a kitchen renovation. Set up a temporary kitchen with a microwave, electric jug, and portable induction cooktop in the garage, spare room, or dining area. The main disruption is during the first week (demolition). After that, the construction phase is quieter and follows a predictable daily rhythm.
How do I prepare my kitchen for renovation?
Empty all cabinets, drawers, and shelves completely before demolition day. Disconnect and remove portable appliances. Set up a temporary kitchen in another room. Close doors to adjacent rooms to limit dust spread. If you have a LIM report or previous building plans for the property, have these available for your project manager.
What happens if you find problems during demolition?
It is common to discover hidden issues in older Auckland homes once walls and floors are exposed — water damage, outdated wiring, substandard framing, or asbestos-containing materials. Your renovation company should assess and quote any remedial work before proceeding. This is why a 10–15% contingency budget is recommended for every kitchen renovation.
Should I use a designer for my kitchen renovation?
For mid-range to luxury renovations ($30,000+), a professional designer is a worthwhile investment. They optimise layout and storage, create 3D visualisations so you can see the result before construction, recommend materials suited to NZ conditions, and help avoid costly design mistakes. Design fees in Auckland typically run $552–$4,830+ depending on scope.
How are kitchen renovation payments structured in NZ?
Most NZ renovation companies use staged payments — a deposit on contract signing, progress payments at key milestones (e.g. after demolition, after cabinet install), and a final payment on handover. At Superior Renovations, your written quote includes a payment schedule and construction timeline so you know exactly what is due and when. Avoid any company asking for more than 30% upfront.
What is the best time of year to renovate a kitchen in Auckland?
Kitchen renovations can be done year-round in Auckland since most work is indoors. Autumn (March–May) and late winter (August–September) tend to have shorter wait times for trades and manufacturing slots. Summer is the busiest period — if you want to start in January or February, book your consultation 3–4 months ahead to secure your preferred dates.
Further Resources for your kitchen renovation
- Featured projects and Client stories to see specifications on some of the projects.
- Real client stories from Auckland
- Browse our kitchen design gallery for completed Auckland projects
- Explore our kitchen renovation cost calculator for an instant estimate
Need more information?
Take advantage of our FREE Complete Home Renovation Guide (48 pages), whether you’re already renovating or in the process of deciding to renovate, it’s not an easy process, this guide which includes a free 100+ point check list – will help you avoid costly mistakes.
Download Free Renovation Guide (PDF)
Still have questions unanswered?
Book a no-obligation consultation with the team at Superior Renovations,
we’d love to meet you to discuss your renovation ideas!
[contact-form-7]
Or call us on 0800 199 888
Have you been putting off getting renovations done?
We have partnered with Q Mastercard ® to provide you an 18 Month Interest-Free Payment Option, you can enjoy your new home now and stress less.
Learn More about Interest-Free Payment Options*
*Lending criteria, fees, terms and conditions apply. Mastercard is a registered trademark and the circles design is a trademark of Mastercard International Incorporated.
The post Stages of a Kitchen Renovation in Auckland (2026) appeared first on Superior Renovations. #superiorrenovations


Comments
Post a Comment